 AutoStow Stow Entire Ship.
You can AutoStow the entire vessel using this procedure by setting a specific time frame. For example, you may want to stay ahead of the work crews but not want to AutoStow too far ahead because of changing yard conditions. In this case, you might AutoStow in half shift increments.
Prerequisites
SHAWSB should be set to its default value of N, or you must either select or unselect all bays.
To AutoStow the entire ship up to a specific time:
Set the AutoStow strategy for the vessel (on page 1).
In the vessel profile view, from the Special list, select Do AutoStow.
Alternatively, select Vessel AutoStow Stow Entire Ship.
In the AutoStow Entire Ship window, from the stow time list, select the end time for AutoStow.
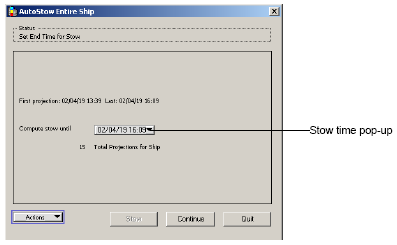

Click Continue to start the AutoStow process.
XPS checks the ship and crane plan readiness and begins planning.
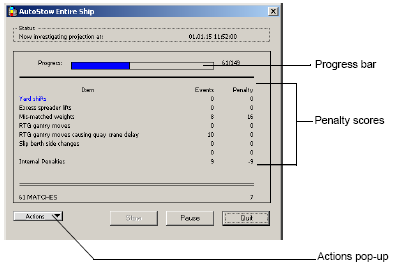
Click Pause to halt the process. Then click Resume when you are ready to continue.
If any error messages (on page 1) appears, correct the error and click Retry. See AutoStow error and warning messages (on page 1) for the recommended solution to the message.
You can use the Actions list to open the Vessel Call Detail and the AutoStow Strategy windows.
Review the AutoStow stowage plan (on page 1).
Do one of the following:
If the results are satisfactory, click Stow. If you want to change the stowage after clicking Stow, you can select the planned moves and revert them. For more information on reverting moves, see the manual Navis N4: Vessel Administrator and User Guide.
If the results are not satisfactory, click Quit and:
Try an alternate AutoStow strategy (on page 1) and iterate the AutoStow process.
Modify the AutoStow strategy (on page 1) and iterate the AutoStow process.
Adjust the Preplanned Work Pattern (on page 1) to match the required loading sequence and iterate the AutoStow process.
Plan some containers manually (on page 1) and iterate the AutoStow process.